• Featured post

C# Async ops

El nucleo de la programacion asincrona son los objetos Task y Task<T>. Son compatibles con las palabras clave async y await.

Primero hay que reconocer si el codigo se usa para trabajos enlazados a I/O o si son CPU intensivos.

  • Si el codigo “espera” algo como una BBDD o una response de un servidor, es codigo I/O. En este caso hay que usar async y await pero SIN usar Task.Run
  • Si el codigo realiza un calculo costoso, es CPU intensivo. Use async y await y genere otro subproceso con Task.run

Async / Await (Operaciones I/O)

La palabra clave importante aqui es await. Lo que hace es suspender la ejecucion del metodo actual y devolver el control hasta que está lista para seguir.

public Task Main()
{
	string contenido = await LeerPaginaWebAsync("http://example.com");
}

public async Task<string> LeerPaginaWebAsync(string url)
{
	using (HttpClient client = new HttpClient())
	{
		return await client.GetStringAsync(url);
	}
}

Read More

Test APIs with Postman - Scripting

We can set pre-request scripts (run before the request) & tests (after execution) at several levels:

  • Collection
  • Folder
  • Request

Snippets

Inside pre-request Script and Tests we have a SNIPPETS column with templates we may use for our code.

postman scripting

Get / Set variables

console.log("Hello world");

// work with local vars
let urlVar = pm.variables.get("protocol");
console.log("value for protocol: " + urlVar);

pm.variables.set("protocol", "http");
console.log(pm.variables.get("protocol"));  

// work with global vars
let globalVar = pm.globals.get("env");
console.log(globalVar);

Read More

Test APIs with Postman - GUI

To test postman I use https://reqres.in. You can use it to learn how to write Postman tests.

Collections

Collections have metadata which you can set up. This includes:

  • Authorization so you don’t need to set it for every single request.
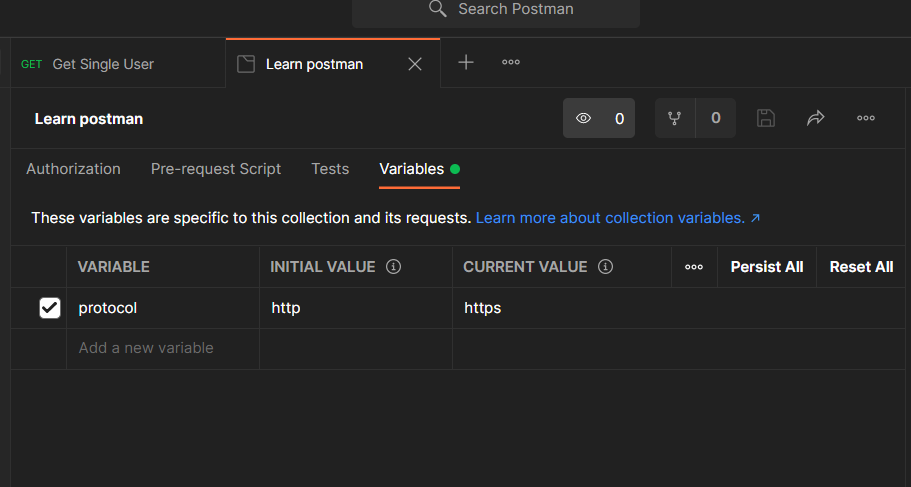
  • Variables, for variables only for this collection (so you don’t use environment vars).
  • Collection tests.

postman gui

Read More

Error al crear imagenes en local (Minikube)

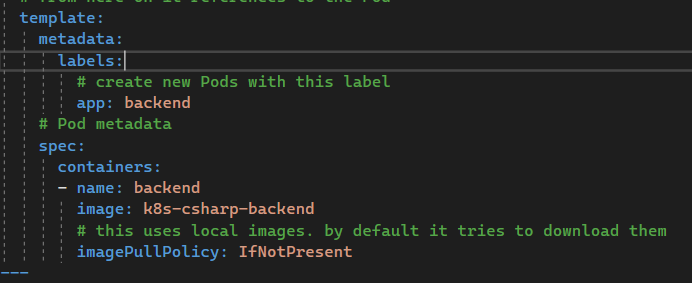
Hay un problema al intentar correr una imagen tuya propia en local con minikube. Minikube tiene su propio repositorio de imagenes y si no encuentra una imagen alli, la intenta descargar siempre del repositorio.

Solución

Set imagePullPolicy: IfNotPresent

error crear imagenes minikube en local

Run the following command:

eval $(minikube docker-env)
# build again the image
# try to run it again

Reference(s)

https://medium.com/bb-tutorials-and-thoughts/how-to-use-own-local-doker-images-with-minikube-2c1ed0b0968

K8s config commands

Config

Azure

log-in into a tenant

az login --tenant 7f2c3a6b-e849-4d6f-b65d-1c0ef8b0f41c

configure local kubectl .kube config file

az aks get-credentials --resource-group my-aks --name aksname --admin

(the –admin part is optional but useful)

Contexts & Namespaces

see all configured contexts

kubectl config get-contexts

configure a context with a default namespace

kubectl config set-context <context_here> --namespace=<namespace_here>
# example
kubectl config set-context my-aks-context --namespace=aks-dev

Read More

Docker-compose how to export volumes to another machine

Data generated and used by Docker containers does not persist after restarts. We use Docker volumes to manage data to solve this issue. We use it to persist data in a container or share data between containers.

Volumes are the preferred mechanism for persisting data generated and user by Docker containers. Volumes are easier to back up or migrate.

Volumes are often a better choice than persisting data in a container’s writable layer, because a volume does not increase the size of the containers using it. The volume’s contents exist outside the lifecycle of a given container.

We have 3 volume types:

Anonymous volumes

Helpful to persist data temporarily. If we restart our container data is still visible. It doesn’t persist when we remove the container. Not accessible by other containers. They’re created inside /var/lib/docker/volume.

Example file:

version: '3.8'  
services:  
  db:  
    image: mysql  
    restart: always  
    environment:  
      MYSQL_ROOT_PASSWORD: root  
      MYSQL_DATABASE: test_db  
    ports:  
      - "3306:3306"  
    volumes:  
      - /var/lib/mysql

Read More

Migrate docker-compose to k8s

Steps to go from a docker-compose file, to build an Image out of the file, upload it to DockerHub, and run it with Kubernetes (minikube).

Set up

Install Kompose

# linux
curl -L https://github.com/kubernetes/kompose/releases/download/v1.22.0/kompose-linux-amd64 -o kompose
chmod +x kompose
sudo mv ./kompose /usr/local/bin/kompose

Clone App and Host It into DockerHub

Clone the files, go to the directory where your Dockerfile is and run:

# mariocodes is my DockerHub username
# kubernetes-custom-java-maven-app is the name of the repo I created at DockerHub
docker build -f Dockerfile -t mariocodes/kubernetes-custom-java-maven-app .

Read More

K8s install Minikube

(Oficial Doc)

Technology to quickly set up a Kubernetes cluster locally to learn how to use Kubernetes.

Installation

How to install on a fresh Ubuntu installation:

Install prerrequisites and kubectl

sudo apt-get update && sudo apt-get install -y apt-transport-https curl

curl -s https://packages.cloud.google.com/apt/doc/apt-key.gpg | sudo apt-key add -

echo "deb https://apt.kubernetes.io/ kubernetes-xenial main" | sudo tee -a /etc/apt/sources.list.d/kubernetes.list

sudo apt-get update
sudo apt-get install -y kubectl

Read More

Common errors in k8s

STATUS CrashLoopBackOff

CrashLoopBackOff and no log appears. This happens as the container has no command to run so it start up and then immediately exits.

Give your image a command.

more here

apiVersion: v1
kind: Pod
metadata:
  name: twocontainers
spec:
  containers:
  - name: container1
    image: python:3.6-alpine
	command: ['sh', '-c', 'echo cont1 > index.html && python -m http.server 8082']
  - name: container2
    image: python:3.6-alpine
	command: ['sh', '-c', 'echo cont1 > index.html && python -m http.server 8083']

i18n & l10n

i18n is just a nomenclature for Internationalization. i18n involves, among other things, the ability to display translated content. It prepares a digital product for localization by for example, separate the content into strings so they are ready to be translated and delivered.

The same goes for L10n. This is a nomenclature for Localization. L10n involves translating content, adapting graphics and finalizing the producto for each regional market.

Reference(s)

https://www.oneskyapp.com/blog/i18n-need-to-know-internationalization/